Dynamics 365 Integration
Capture leads from AI chat conversations and sync them directly to Microsoft Dynamics 365. Built for Teams-first organizations.
What Is Dynamics 365 Integration?
When visitors interact with your AI chatbot and share contact information, that data is automatically synced to Microsoft Dynamics 365 as a new Lead or Contact record.
This is especially powerful for organizations using Microsoft Teams for live chat—leads flow seamlessly into your Dynamics CRM without any manual entry.
Built for Microsoft Teams
Teams + Dynamics
Agents chat via Teams, leads sync to Dynamics automatically.
Azure AD SSO
Enterprise-grade authentication through Azure Active Directory.
Dataverse Sync
Native integration with Dataverse for complete data unification.
What Gets Synced
How It Works
Connect Dynamics
Azure AD authentication keeps your data secure.
Configure Mapping
Map chat data to standard and custom Dynamics fields.
Auto-Sync Leads
Contacts and leads created in real-time.
How It Works: Power Automate Integration
The Dynamics 365 integration uses a Custom API Action in Social Intents that POSTs lead data to a Power Automate HTTP trigger. Power Automate then creates the Lead in Dataverse.
Integration Flow:
Prerequisites
- Microsoft Dynamics 365 environment with Dataverse
- Power Automate license (included with most Dynamics 365 plans)
- Permission to create Power Automate flows and Dataverse records
- Social Intents Business plan or higher (AI Actions required)
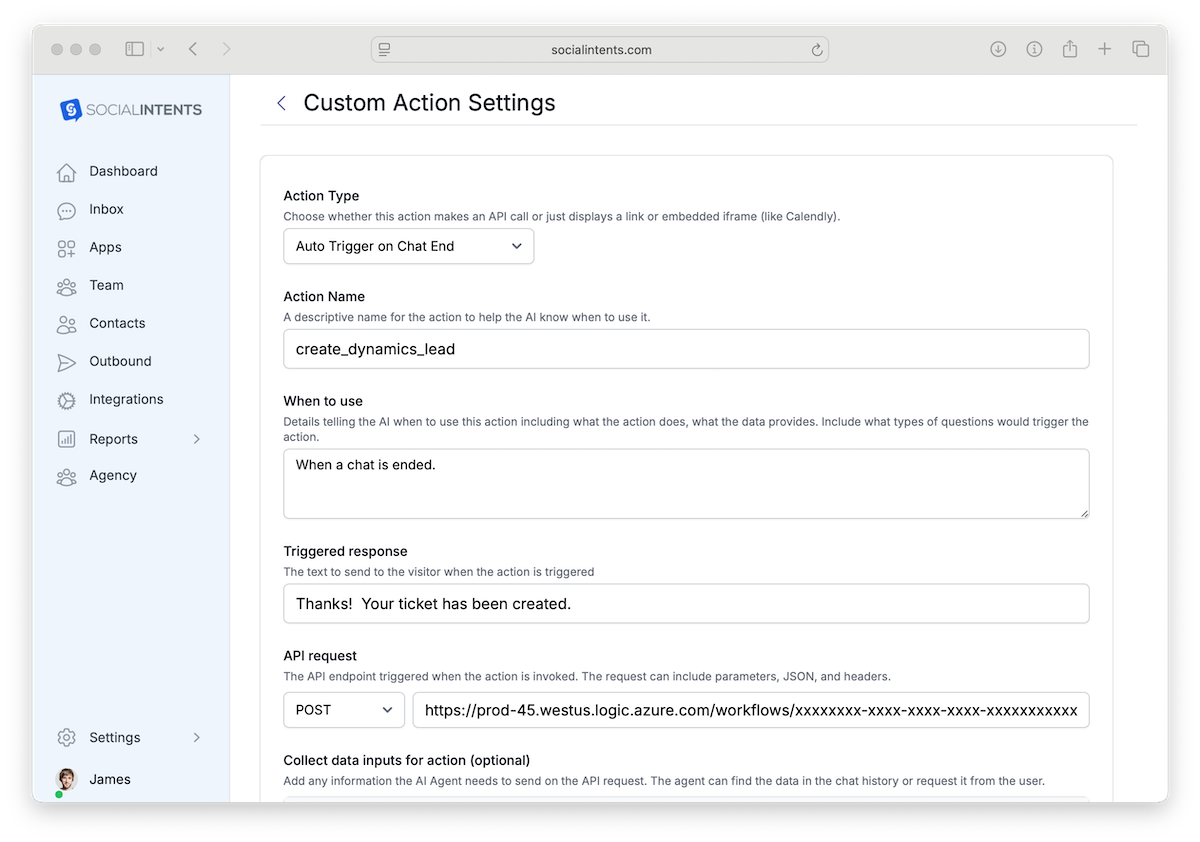
Step 1: Create the Custom API Action
In Social Intents, go to AI Chatbot Settings → AI Actions, click Add Action, and configure:
| Field | Value |
|---|---|
| Action Type | Auto Trigger on Chat End |
| Action Name | create_dynamics_lead |
| Collect data inputs | subject, firstname, lastname, company, email, phone, website, transcript, sessionId |
| HTTP Method | POST |
| API URL | https://prod-XX.westus.logic.azure.com:443/workflows/YOUR_FLOW_ID/triggers/manual/paths/invoke?api-version=2016-06-01&sp=%2Ftriggers%2Fmanual%2Frun&sv=1.0&sig=YOUR_SIG |
| Headers | Content-Type: application/json |
JSON Request Body
{
  "subject": "{{subject}}",
  "firstname": "{{firstname}}",
  "lastname": "{{lastname}}",
  "company": "{{company}}",
  "email": "{{email}}",
  "phone": "{{phone}}",
  "website": "{{website}}",
  "transcript": "{{transcript}}",
  "sessionId": "{{sessionId}}"
}
Step 2: Create the Power Automate Flow
In Power Automate, create a new Instant cloud flow with an HTTP request trigger.
A) HTTP Request Trigger
Use “When an HTTP request is received” as the trigger. Paste this JSON schema so Power Automate knows the incoming data shape:
{
  "type": "object",
  "properties": {
    "subject":    { "type": "string" },
    "firstname":  { "type": "string" },
    "lastname":   { "type": "string" },
    "company":    { "type": "string" },
    "email":      { "type": "string" },
    "phone":      { "type": "string" },
    "website":    { "type": "string" },
    "transcript": { "type": "string" },
    "sessionId":  { "type": "string" }
  }
}
B) Add a New Row in Dataverse — Leads Table
Add a Dataverse → Add a new row action. Select the Leads table and map the fields:
| Dynamics 365 Field | Power Automate Dynamic Content |
|---|---|
| Topic (Subject) | triggerBody()?['subject'] |
| First Name | triggerBody()?['firstname'] |
| Last Name | triggerBody()?['lastname'] |
| Company Name | triggerBody()?['company'] |
triggerBody()?['email'] | |
| Business Phone | triggerBody()?['phone'] |
| Website | triggerBody()?['website'] |
| Description | concat('Chat Transcript (Session: ', triggerBody()?['sessionId'], '):\n', triggerBody()?['transcript']) |
C) Optional: Attach Transcript as a Note
Add a second Dataverse step — Add a new row in the Notes table — to attach the full transcript as a Note on the Lead:
| Field | Value |
|---|---|
| Subject | Chat Transcript |
| Note Text | triggerBody()?['transcript'] |
| Regarding (Lead) | outputs('Add_a_new_row')?['body/leadid'] |
D) Response Action
Add a Response action to return a success status:
Status Code: 200
Body:
{
  "status": "success",
  "leadId": "@{outputs('Add_a_new_row')?['body/leadid']}"
}
Troubleshooting
Flow never triggers
Ensure the Power Automate HTTP POST URL is copied correctly, including the sig query parameter. Test by sending a manual POST from Postman or curl.
Lead created but fields are empty
Check that the JSON schema in your HTTP trigger matches the body your action sends. Mismatched property names will result in null values.
403 Forbidden error
The Power Automate flow URL may have expired. Re-save the flow to generate a new URL and update the API URL in Social Intents.
More CRM Actions
Unify Teams Chat & Dynamics 365
Connect your Microsoft stack and capture every lead automatically.
14-day free trial. No credit card required.